|
The Ultra Tec Owners' Newsletter |
|
|
|
|
||
|
|
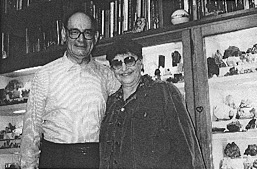
Maxine and I travelled to the East Coast and Europe late last year--a mix of business and pleasure. I'm happy to say that most of the business proved pleasurable, as was the visit to our Ultra Tec representative in Turin, Dr. Sergio Gallo. He and his wife were wonderful hosts. A visit to his home was a treat--Sergio is a collector of minerals--of true museum quality. They were set in lighted cabinets that covered a large wall, and were dazzling (the photo shows a portion of the cabinets-that's Dr. Gallo and Maxine). |
|
|
He also showed us his
collection of faceted stones--both he and his son Paolo are UltraTec
facetors--and the quality of the work was outstanding.
With that trip being at the same time as the Southern California Fair, it was again "the Kids" who handled the Ultra Tec booth (as they did last January in Sacramento). |
||
|
|
It is excellent experience for them, and a healthy thing for Ultra Tec (since my
plan for immortality might run into problems). Everything worked out fine, (and, to
the facetors who helped out the young people--thank you!). There was an Ultra Tec
Best Case award at this show--won by Ken Leifeste. (Ken
joins the long list of award winners with a surprised look-in the photo). Ken has
often demonstrated Ultra Tec faceting at the Southern California Show, and we know
he's an excellent facetor, and a super nice guy. We offer him well deserved
congratulations!
Right soon, lt wlll be time for this year's show - it's planned for September 25th and 26th, again at the Orange County Fairgrounds in Costa Mesa. |
|
|
Sacramento--The Faceters Fair.
DIANONDS ANYONE?
|
||
|
|
We know that many facetors are interested in diamond cutting, and if you are one of
those (or if you're like me-not interested in doing it, but interested enough to
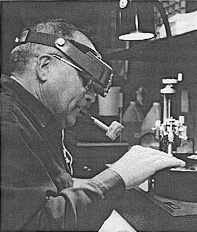
read about it) here's a "super tip" sent to us by Roy Greene, our dealer in
Franklin, North Carolina. Roy (see the photo) called it:
An Adventure in Diamond Cutting "As with many facetors I have often thought of cutting diamond, with the result that I have read everything I could find on the subject. All of which tends to discourage the average facetor from even trying such a feat. |
|
|
My reason for being
interested in diamond cutting is that burned and chipped stones of 1/4 carat or
less are of no value to the jeweler as the cost of repair can be more than the
cost of a new one. As a result, they can be acquired for a very small price, or
hopefully nothing. I have had no thought of cutting from rough.
On thing I learned from reading was that a mixture of diamond grit ranging from 325 to 8000 is used along with olive oil or an exotic mixture that seems to be favourites of each individual cutter. Also that the lap used is a fine grained cast iron. Not having either the mixed grit or the cast iron lap, but having a burned diamond or two, I blindly went ahead with the 1/2 carat stone that was the worst burned I had ever seen. |
||
|
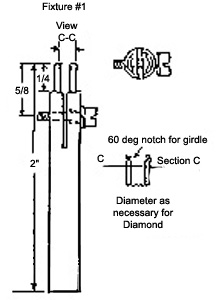
First I made a holding fixture for the stone which
would fit my facet machine, an Ultra Tec, then I found a worn out 1200 grit lap
and some 600 and 1200 diamond compound. Smearing some of each on the lap, I first
tried to cut down the table to remove burn marks. This proved to be a very slow
process, so after a half hour, I found a piece of 2 inch brass rod about 3 inches
long, with a hole through the middle, stacked it on the 45 degree fixture turned
on the machine and went to watch TV. Checking after about 30 minutes, I found
some progress so I smeared a little more compound into the track burned into
the lap, let it run another 15 minutes and the burn marks were gone.
|
|
|
|
With the table done, the 45 degree fixture was removed, the holding device
inserted in the facet machine and an attempt at polishing the mains was started.
I quickly found that I had to find the direction in which the facets could be
cut. A facet machine that has the capability of being reversed is of great help! You can tell by feel when the proper direction is found. A definite drag on the stone is the indication. Once this was found, a look at the facet will tell
if it is cutting cleanly. On one facet I noticed that the stone was cutting but leaving a very rough surface. Changing the direction a bit eliminated this.
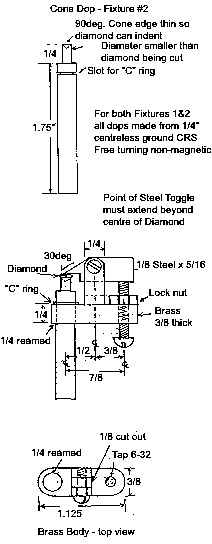
The holding fixture I made clamps on the girdle of the stone, with 2 segments cut out to give access to 2 main facets at a time. The two segments remaining are clamped on the girdle by a screw. This permits cutting two main facets, 180 degrees across the stone, the screw is then loosened, the stone rotated in the holder to give access to two more mains at 90 degrees to the first two, the screw tightened, and the mains are cut. This is repeated until all of the mains are cut. On stones of 20 points or more the star facets can all be cut without having to rotate the stone in the fixture. One stone I tried, however, had such a shallow crown that it was necessary to rotate it to prevent cutting the holding fixture. After all the mains and star facets are cut, the break facets are cut, the holding fixture giving access to four breaks in each position. After the crown is complete, the stone is turned over in the fixture to give access to the culet. The main and girdle break facets are cut by positioning the stone in the fixture. I found that it is best to cut the main and its break facets for each position rather than cutting the mains and then the breaks, thus eliminating 1/2 of the necessary positions . All of the above worked well on burned stones. However, with a chipped stone it is usually necessary to trim down the girdle. This could not be done using the first fixture so a new one had to be made. This second fixture provides a toggle, tightened by a screw to hold the diamond in a cone-dop. The dop can be rotated in the fixture thus giving access to the complete girdle. The girdle was then faceted to eliminate the chip. At this point I found that two directions at 180 degrees across the stone were extremely hard with the two directions at 90 degrees to the hard direction cutting easily. I will have to admit that I didn't have the patience to get the stone fully round. This will require more experiments in cutting the girdle! Maybe another weight here. |
|
|
|
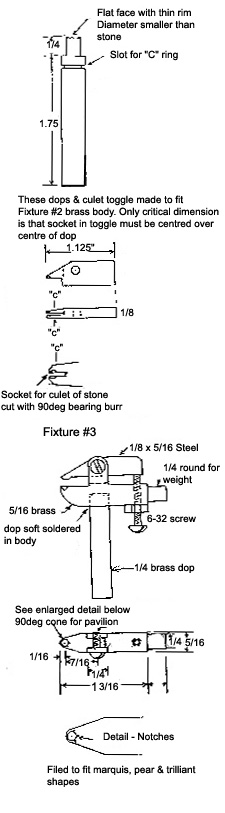
After cutting the girdle of the stone described above, having trouble
getting the stone round, I went back to my books! After some reading about
the grain in diamonds, I decided that I needed another fixture. I wanted to
be able to cover the entire lap so that I could cut across the girdle rather
than along the girdle as was necessary with the #2 fixture.
|
||
|
After the girdle is cut, it will be too thick to put back in the first fixture,
so, while in the second fixture, the crown mains were cut to about 35 degrees
to the point where a proper girdle thickness as obtained. The stone was then
replaced in the first fixture and cut as with the burned stone. Upon completing the new #3 fixture another chipped stone was selected and girdle cutting attempted. This went somewhat faster but I still had to contend with hard points. I found that the difficulty could be reduced by going 1 or 2 notches on the index wheel, either side of the hard point. This will leave a small peak on the girdle which being small, can be cut more quickly. To make it easier, the #3 fixture was equipped with a 1/4 inch boss to permit the use of a weight. Still, there is a problem in getting the stone truly round. At about this time I acquired a cast iron lap. With this, I decided to make a mixture of diamond grit to charge the lap. Using 325 through 8000 grit, (1 gram each of 325, 3000, and 8000 plus 2 grams each of 600 and 1200), I charged the lap. Trying it out on two severely chipped stones, I found that it worked more quickly in cutting off the broken side of the stones to make half moon shapes. At first it left a scored polish, but this smoothed out with use. While it cuts somewhat faster, it is more noisy than the worn 1200 lap. As of now I've successfully recut 3 rounds, (on 2 of which I had to recut the girdle. They ended up as almost round), 1 broken marquis which was converted to a pear shape and 2 trilliants with broken corners which were converted to kite shapes by clipping 2 corners on each. Then there are the 2 half moons mentioned above. Since I'm still having trouble cutting girdles for round stones, I'm still experimenting! If I find an easier way I'll let you know. I have several things in mind to try. |
|
|
|
Some tips and comments:
Cutting the table of the stone can be speeded up if you find the proper cutting direction and then stack a weight on your 45 degree fixture.' On my machine, after the proper direction is found, I can turn my mast to lock the head in position and then apply the weight. When cutting appears to slow down, smear a little more diamond grit into the cutting path. Where professional diamond cutters use dry diamond powder and olive oil, our regular diamond paste works OK after you get the waxy material thinned out. I still want to find something to thin the mixture with that will not evaporate. I also tried using only 600 grit. This also worked very well. The only reason I can think of for the use of a dry powder is that they cost less than the regular compound that we normally use. In recutting or repolishing stones, I found that as is common with commercially cut stones of any type, the angles and rotation (placement of the mains) vary all over the lot. One thing you should do is place your main facets in the same position as was on the stone to start with. The original cutter has placed them to avoid hard points and you may as well take advantage of his experience!" ...end of (long) "super tip"... NEW STUFF FOR ULTRA TEC? It's been over two years since the Spindle upgrade, and we've been just sort of "digesting" and thinking things over. Lately, some ideas have come up--for "convenience" things. We've acted on a couple of them, listed below (meanwhile, if you have some urgent "need", let us know about it). |
||
|
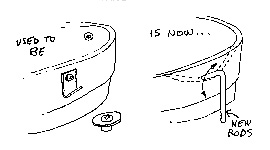
Hold-down Rods. By the time you get this letter the new Hold-down Rods will be standard on all new UltraTecs. See the sketch--the picture tells the story. If you purchased a new machine after August 5, 1993 (and if it didn't include the new Hold-down Rods) write to us-you are entitled to a free set. It is easy to retrofit into prior machines--just remove the old hardware, and install the new rods into the existing threaded holes in the baseplate. The holes in the Splashguard (where the old clips used to be) can be plugged by reinstalling the old T-nut, or by plugging the holes with silicone. |
|
|
|
We made the change because they act more positively than the old clips--they're an example of "why didn't we think of that before". For those who want the retrofit--it's listed on the price list. They are, incidentally, machined
stainless steel.
Brass dops "across the board". As many of you know, brass dops have been available in sizes up to 6.4mm. Finally, we have the larger sizes available too. I really like the brass dops now you know why we have them). Specialty dops--emerald dops and pot dops--will continue to be made of aluminium. Coming to the end of the line--the 96 Quad Index Gear. This gear design by Howard Stanley, is very sensible (it is numbered in four sections--0 to 24, 24 down to 0, up again to 24, down again to 0--four equal "quadrants"). Since most designs have the same few stops in each quadrant, the user very quickly memorizes the design. But--the World started with continuously numbered gears, and I guess gears will be continuously numbered forever. The problem: We've decided to eliminate silk-screening, and to use photo-offset decals for all gears--and the Quad is a victim of not being able to justify the tooling. If you want one, order before September 30 1993 - we'll make one last production run, and then it's history. Lifetime Warranty This isn't a hardware change, but I guess it is in the category of "New Stuff". We now offer a Lifetime Original Owner Warranty to purchasers of new machines--it started in July of this year. Our quality experience, which was always very good, has been "super" in the last several years--and I felt the additional assurance for the owner is the right thing to do. HELP! ...out of space! So long for now...from all of us, and me. |
||
| : |
|
|
|
TWO NEW CUTS FOR YOU |
||
|
|
Forrest Dunbar, a resident of Diamond Bar, California may be the most enthusiastic rock hobbyist we know...and we know one or two enthusiastic hobbyists. He's confessed to being an uncontrollable, hooked ...ADDICT! hooked on rocks".
It all started for him as a youngster, growing up on a small farm in Idaho captivated by the canyon rocks. It led him to every aspect of lapidary, step by step - right to the world of faceting. In retirement, he and his wife had had the chance to travel and bring home material from around the World. And what better could one do than spend time faceting all of that? I know that Forrest would answer - "can't do anything better than that!" |
|
|
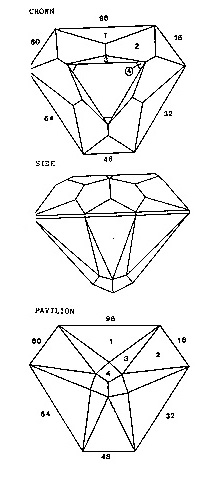
This is his DILEMMA CUT.
Angles for CZ Index 96 GIRDLE Angle Index 90° 96-32-64-16-48-80 CROWN Angle Index C-1 39.5° 96-32-64-16-48-80 C-2 35° 95-01-31-33-63-65 C-3 27° 96-32-64 C-4 27° 16-48-80 0° Table For small gems step 4 facets may be omitted. In any event, cut them with a very light touch. PAVILION Angle Index P-1 49° 96-32-64 Cut these to a center point. P-2 47° 16-48-80 These will not reach center point. p-3 45° 94-02-30-34-62-66 P-4 41° 96-32-64 |
|
|
|
|
Don Cook of Norfolk, Nebraska is a professional cutter and an avid teacher of faceting. He likes to raise a fuss on the phone, and be "Mr. Irascible" (look that up, Don) - but we know he's really "Mr. Heart of Gold" Its easy to get him laughing ( I know he'll grumph at me for saying that, too ).
The design that Don sent us doesn't have a name yet ( The Irascible Cut? ). He says it's a revised version of a very popular diamond cut called the Quadrillion. Don's even a bit into the faceting accessory business. For people who are interested in fairly intensive cutting, he offers a Three position Transfer Block and also hardwood holders for dops (a 3" cube holds 45 dops, 4.5" cube holds 125, and a 6" cube for 245). For more information about those contact Don at: Skitter Gems, 205 S. 15th, Norfolk NE 68701. |
|
|
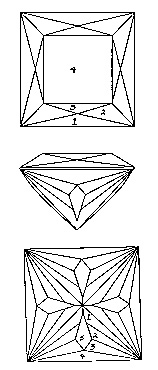
The IRASCIBLE? CUT
Crown 17 Facets Angle Index 1 - 60° 96-24-48-72 establish girdle 2 - 40° 96-02-22-26-46-50-70-74 3 - 25° 96-24-48-72 4 - Table Crown angles are adjustable for desired table size. Pavilion 36 Facets Angle Index 90° 96-24-48-72 square stone 1- 43° 90-06-18-30-42-54-66-78- cut to point 2- 45.75° 92-04-20-28-44 52-68-76-50-70-76 3- 51.75° 94-02-22-26-46-50-70-76 4- 67° 96-24-48-72 5- 47° 96-24-48-72 Step #5 is not necessary unless you use cyanoacrylate cement. |
|
|