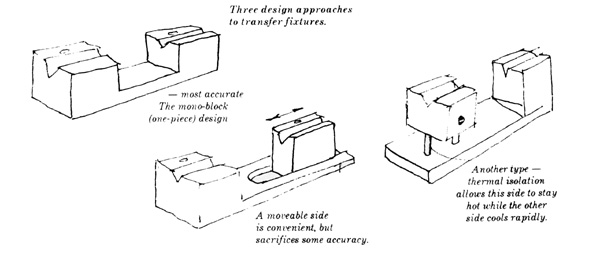
|
|
|
|
There are two aspects of the transferring process: mechanical alignment
and dopping. Both of these tasks are difficult for the beginning faceter,
but are taken in stride by the experienced faceter. Most people learn to
use the old standard technique, aligning the stone to the new dop by using
an opposed V-block device, and attaching the stone with dopping wax. This
paper does not mean to suggest that the standard technique is wrong, but
discusses some of the problems and describes modified techniques. People
have told us they found them preferable and you may wish to try them. If you
have difficulty, just remember how it was the first time you performed a
transfer and give the new idea a chance.
|
||
|
* Grind and polish the pavilion first.
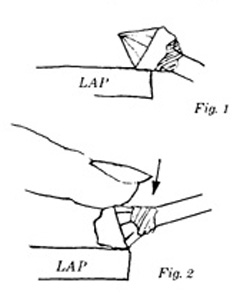
* When the pavilion is completed. grind a small "alignment facet" on the crown side (fig. 1). This is done by pointing the spindle up several degrees creating a "negative angle," and grinding at the edge of the lap, as shown. When doing this set the index gear at 0. * Having added the "alignment facet" proceed with the transfer process. * With the stone now reversed onto the new dop, insert the new dop into the dop chuck. Tighten the set screw very lightly, so the dop can be rotated by hand easily. |
|
|
With the index gear at O and the angle dial set at a positive
angle that mirrors the previously used negative angle, level the "alignment
facet" on the lap (fig. 2). Finger pressure on the stone will cause it to
level. Then tighten the dop chuck set screw-an accurate alignment has been
accomplished. This is a proven technique that most people like. If your gem
design includes a faceted girdle, one of those facets can be used for
alignment making the process that much easier.
THE MECHANICS OF TRANSFER A DIFFERENT TRANSFER TECHNIQUE, "REMOVAL AND REALIGNMENT" This technique was originally described to me by John Grieger, who has been an ULTRA TEC faceter for many years. John used no transfer fixture. First though, let's look at a method that does use a transfer fixture, but not in the usual way. |
||
| Before removing the dop from the machine to perform the transfer, cut the "reverse facet" mentioned above. The next step (and I gasped, when I first saw it done) is to remove the stone from the first dop. Clean the stone and set it aside. Prepare the fixture by putting a clean flat dop of any convenient size on one side. Prepare a cavity dop with wax, insert the pavilion of the stone into-the wax, and placing this into the opposing side of the transfer fixture, press the rough table (the originally dopped surface) against the face of the flat dop. This will have the effect of squaring your stone to the centreline of the cavity dop, while the cavity dop itself controls radial positioning. | 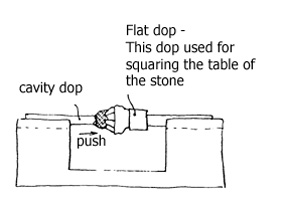
|
|
|
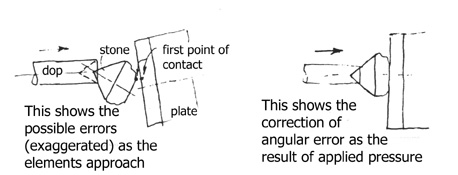
There are apparent advantages to this system. Early removal of the original dop avoids a danger of movement of the stone, which is a problem when the original dop is removed as a last step. It also corrects the effect of any mechanical error in the straightness of the original dop. This particular method was taught at the ULTRA TEC Faceting School by Ed Danbom, who is a noteworthy custom faceter. John Grieger's version of this "remove and realign" method, using no transfer fixture at all, was to place a prepared cavity dop into the faceting head, which was set at 90°. Then he would use an accurate 90° block which was set on the lap or platen as a square surface to push against. This method is a little trickier in that it depends on the forward thrust of the dop, which is accomplished by sliding the faceting head forward to equalize pressure against the rim of the cavity dop and to eliminate lateral angular errors. 
A DIFFERENT APPROCH TO DOPPING A WAXLESS TECHNIQUE This section deals with the dopping method, the means of cementing the stone to the dop. The use of dop waxes has been traditional and satisfactory for many faceters. The very heat-sensitive nature of the wax, however, is a source of difficulty with the possibility of stone movement during the faceting operation (if not a "cold flow," then perhaps, a "slightly warm flow"). This characteristic may also cause the wax to release the stone altogether, although this is more frequently the result of an insufficiently clean stone, or of the wax having cooled too much before the stone was set into it. When a stone lets go, it is probably the most frustrating occurrence in an otherwise satisfying experience of faceting a stone. The fact ULTRA TEC even manufactures (at the request of faceters) a "target dop," whose only use is to help realign a popped-off stone, testifies that for many this is more than an occasional problem. A cure for the problems of dopping waxes exists in the use of more modern adhesives, a field in which there has been great growth in technical sophistication. The main problem in this apparent solution is new adhesives are so good that they do not like to let go very easily. An ingenious method exists, however, one which has been used for a long time by another expert ULTRA TEC faceter, John Cornwall of New York. The sequence of operations is easy to explain, and easy to perform: The initial dopping is performed with an Alpha Cyanoacylate adhesive, such as the readily available Eastman 910. When the pavilion is complete and it is time to transfer, the stone attached to the dop on the crown is put into the transfer jig. The adhesive used in the dop for the finished pavilion is epoxy thickened with ordinary corn starch. The contact between the gem's pavilion and the dop is left open enough to allow solvent to penetrate between stone and dop for removal after the gem is finished. With the crown and pavilion dops locked in proper position place the transfer jig in an oven at about 200°and cure the epoxy for30 minutes. Allow the assembly to cool completely before removing the dops from the jig. You will find that while the heat sets the epoxy, it releases the bond of the Eastman 910 Adhesive. The stone almost always separates from the crown dop with a light tap. Thus a semi-automatic and accurate transfer results. THIS TECHNIQUE IS ONE IN WHICH THE WAX CREATES A "NEST," WHICH IS THEN USED WITH AN ADHESIVE BOND, THE NESTED TRANSFER METHOD There is another method, one which does not give up on wax. but uses it as an extension of the dop rather than the sticky stuff. This method was explained to a meeting of the Southern California Faceters Guild by Jim Perlowin. He shared his method with other members at a meeting during which much dissatisfaction with traditional techniques was voiced. Jim is an ULTRA TEC faceter who has been innovative both in cutting techniques and gem designs. In this technique the initial dopping is performed with Eastman 910, or a similar adhesive. After cutting of the pavilion and using the "reverse facet" method, the initial dop and stone is placed into a transfer fixture. The second dop is readied with wax, as if an old fashioned wax-transfer were going to be performed. But the pavilion of the stone is specifically not cleaned, quite the contrary, a few good "finger prints" are applied. As most of you know when you press such a stone into the wax, the wax will release it. That is just what this method wants. After the wax cools, pull back the stone, still attached to the initial dop, and what you have is a nicely aligned wax impression-a nest which is customized to your stone. Then remove the stone from the first dop. Next the Eastman 910 is applied to the next, and the stone is inserted, using a new flat dop as a "pusher" in the transfer fixture. Those of you who are purists, and speaking to faceters there is more than one purist out there, will probably point out that this technique deals more with the mechanics rather than the process of adhesion. However you want to classify it, it is effective. SUMMARY We think these are all techniques worthy of trying. Some people are using them now very effectively. We certainly welcome other ideas. I imagine we will get them, and so a supplement to this paper is quite possible. Our files now contain other ideas, particularly in the area of mechanical devices. I did not include all of these; one is excessively expensive, one is mechanically flawed and probably several have been overlooked. Using this as a vehicle for discussion in your faceting group may stimulate people to contribute their "secret" methods and ideas. If you want additional copies, ask us for them or go ahead and duplicate this yourself. |
||
|
Return to the |
All content including images and text remain the
property of UltraTec. |
|
