|
The Ultra Tec Owners' Newsletter |

|
||
|
|
|||
|
LOS ANGELES COUNTY FAIR. During September, we had an Ultra Tec
faceting machine in operation at the L.A. Fair - at the Gems
and Minerals exhibit. This is probably the biggest
annual fair in the Country - bigger than any State Fair we've
ever seen. The Gem and Mineral display, for the past years, has
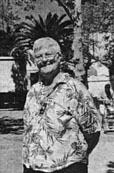
been coordinated by Arlene Billheimer of the Pasadena Gem
and Mineral Club - always cheerful and optimistic, Arlene's a
super organizer and does an excellent job -
and we tip our hat to her (no, that's not funny hat she's wearing
in the photo - that's a California palm tree in the background).
|
|
||
|
Demonstrating on the Ultra Tec stand were faceters Gail Paulson, Todd
Neikirk, and Henry Debick. Henry entertained the onlookers by
completing a "Butterfly Cut" (a design by Don Clark)
as they watched and learned about faceting. It's
no longer a surprise that most people visiting the Fair have no idea of
how faceting is done and certainly no idea that they themselves can do
it. So it's a good place to "get out the message". Ultra Tec gives
thanks to all the people who helped out - the Gem and Mineral displays
and demonstrations are a high point for visitors to the Fair.
|
|||
|
A FACETERS SEMINAR-_ connected with the 1996 Show of the
National Federation of Mineralogical Societies. It will be in
Riverside California, on August 9-10-11 mark your new
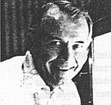
1996 calendar! The seminar is under the direction of Glenn Klein
(in the photo), an award-winning faceter - thoughtful and :
thorough-planning - who I am sure will deliver an
"award-winning seminar" (Glenn should need no introduction to
readers of the Ultra Tec Some Times). A "seminar" should not be
confused with a "show" (look back at my comments about the Northwest
Seminar in the previous newsletter).
|
|
||
|
This Seminar will be 3 days about
faceting - interesting speakers - plenty of time to exchange information
and ideas with others - a chance to make faceting friends - plenty of
fun - and a chance to take in the exhibits of the National Show. You will
leave the Seminar a smarter and better faceter.
|
|||
|
1. Insert the dop so that the dop seats fully and firmly-engaging
the cross-pin in the Spindle ("keying it"). 2. Set the Index Gear to the 0 position - the Detent is engaged with the 0 on the Index Gear. Now, loosen the set screw that holds the Index Gear to the Spindle, allowing the Spindle to slip - to rotate freely - within the Index Gear. 3. Now you can rotate the spindle freely until you have the stone lined up the way you want it. Then, retighten the setscrew on the Index Gear - simple (incidentally, the setscrew has a brass tip which holds tightly without harming the steel spindle). 4. OK - you've done it - you've set a "special" keyed position. You can now remove the dop if you wish and then reinsert it, to its special keyed position. Before you do your next stone, reset the standard 0-cross-pin key position, by using the calibration bar (that little "hammer"). It's all fast and easy. You don't always have to set a keyed "special position" - if you have a long thin stone - like a tourmaline - it's easy to reset the stone's radial position by lining up the stone itself on the lap - so, in those cases, you can use the "pull-forward" over-ride of the key. Why isn't that in the Owners Manual? - we'll put it there right now. DOPPING WITH SUPER GLUE. I' ve been using super glue (specifically, Loctite 404) for a number of years. The only thing I didn't like about it was that upon transferring into a cavity dop, I had to wait longer than I liked for the bond to be strong enough to proceed. The problem was that there was insufficient air to make the glue set up quickly and thoroughly-the stone was acting like a "cork in the bottle", slowing down the hardening process, since the only air getting at the glue was what sneaked by the facets. |
|||
|
Somebody suggested (I don't remember who it was - but I
know there will be a number of claimants) that it would be
good to drill a side hole into the cavity dop into the lower
clearance portion - allowing air to get in behind the stone.
A hole on one side - OK, a hole through - better. See the sketch.
|
|
||
|
I've tried it several times now, and it
works very well. It also helps after faceting is complete,
in removing the stone - I use the boil-it-in-water technique
- and the hole allows the water behind the stone (just like
it let the air in).
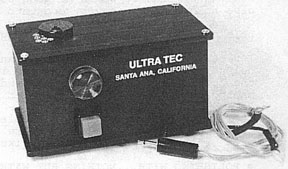
It's tempting to just add that hole on regular production - but before we do, we want to make sure it doesn't cause a problem with other dopping techniques, like wax, for example. POLISHING WITH...NOTHING BUT WATER? That was the subject of an article by Glenn Klein in "Angles", newsletter of the Faceters Guild of Southern Cal. Yes, he said he polishes with just plain water - no added polishing agent. He assumes it's the sub-micron stuff (whatever) that's in the water - and he allows that it's a very slow process (he said "I'm the slowest faceter in the West-and probably the East, too" - as a competition cutter, he takes many hours on a stone). But he says plain water does the job. One of my neighbors is a water engineer - and I spoke to him about it. I soon became educated. Water is not a dry subject. Among the things I learned was that with rare exception our tap water is not filtered very finely - it contains occasional particles of 10 to 12 microns or more (that's like the particle size on a 1200 mesh lap!), and many in the 3-9 micron range. Considering that we like to polish with Cerium Oxide at 1 micron (which breaks down to smaller particles), or Aluminum Oxide at 0.5 microns, you can see that using tap water represents a risk (depending on where you live, more or less of a risk). Glenn did write that sometimes a scratch would "suddenly appear". Now, I'm not trying to debunk the idea of polishing with plain water, but I guess that Glenn lives in an area with relatively clean water. I've heard from quite a few faceters, however, in other parts of the USA, who have complained about "scratchy water", and they've had to use filtered or store-bought water. My general advice is: if you suspect your water is "scratchy", it probably is, and you need to get filtered water. If you do have filtered water in your kitchen (many people do), don't be lazy - when it's time to refill your drip tank, make that trip to the kitchen for the filtered water. And, if you're in a mood (a long-lasting mood) to try Glenn's prescription, try it - and let us know how it goes. Anyhow, Glenn - years back, I was faceting a piece of Apatite. It's hard to polish - it's soft, and it flakes - and when I asked an old timer what to do, he said "Whet your Apatite". NEW THING - A "Stop Indicator" - a device that signals contact with the stop. Is this similar to the "Down Indicator Light"(the "DIL")? It is. But, this Stop Indicator features a buzzer (which is optionally-on), and several other improvements: |
|||
|
The unit is in a small
(2"X 2"X 4") box that can be set conveniently in-line with the work, so
you don't have to look back at the Mast (as you do with the DIL).
It uses a standard 110V outlet - no worry about batteries There's no "hardware" to hang onto the machine - only the wires connect to the Mast - easier to maintain - reliable. |
|
||
|
The Buzzer feature is for speed - work until you hear a "beep" and then index to the next position - and move along very fast. The buzzer is in the box, so that its sound is muted enough not to drive one's spouse crazy - but there is a control that lets you increase sound level when you're working on a coarse lap. And there's a switch to turn off the buzzer, when you want to. Would I get one of these if I already had a DIL? Well - I did (of course at my special employee price). It's nicer than the DIL- |
|||


